Monday, September 26, 2016

{Fall Eats}: A Guide to Apples

Fall has finally graced us with its presence once again and that means many things on the culinary spectrum, not the least of which is the prime season for apples.   As you prepare to head to the orchards, markets, and kitchen to indulge, you'll want this handy primer from Williams-Sonoma, featuring nine varieties, to keep you on your cooking, baking and eating toes.   Whether you're talking cider, applesauce, apple butter, and more, you'll know which apple perfectly fits the bill.

Photo Credit: Williams-Sonoma

Happy Eating!


SHARE:

Monday, November 2, 2015

All About Pie: Primers, Tips & Tricks

Photo Credit: Williams-Sonoma

When it comes to baking, pies are in a class all their own.  From mastering the perfect dough, to blind baking, to avoiding common mistakes, to yielding (and decorating) the best crust ever, I've gathered the essentials to ensure your pie-baking expeditions are better and more scurmptious than ever.

William-Sonoma's Pie Primer serves up everything you need to know to master a perfect dough and yield a beautifully delicious pie--again and again.

Bon Appetit reveals the six common pie-baking mistakes--and how to avoid them.

Martha Stewart rounds things out with a Pie Crust 101 tutorial for fail-proof results.

With these pie essentials in tow, you'll be all set to indulge in...Happy Baking!
SHARE:

Tuesday, November 25, 2014

Rosemary Popovers

If you're looking to bring some simple, homemade goodness to your table, then homemade popovers is a great way to go.  I baked some over the weekend, adding in fresh rosemary for an extra savory touch.  It was my first time--and a good excuse for putting my popover pan to use, although you don't need one to make these.  A muffin pan will also suffice in yielding warm, delicious popover goodness.

Happy Eating!


Rosemary Popovers
Recipe courtesy of Williams-Sonoma

When making popovers, its important to use a pan that absorbs heat well. The batter needs a burst of heat to convert the moisture to steam, which causes the batter to expand and pop over the sides. When perfectly cooked, popovers emerge with crispy brown exteriors and moist, almost hollow centers.


Ingredients:

2 eggs  
1/4 tsp. salt 
1 cup milk 
2 Tbs. unsalted butter, melted 
1 cup all-purpose flour 
1 1/2 Tbs. very finely chopped fresh rosemary 
1/2 Tbs. very finely chopped fresh flat-leaf parsley


Method:


Butter a popover pan or the wells of a 12-well muffin pan.

In a bowl, lightly whisk together the eggs and salt. Stir in the milk and butter. In another bowl, stir together the flour, rosemary and parsley. Add the flour mixture to the egg mixture, whisking until just blended. Do not over beat.

Fill each cup about half full and place the pan in a cold oven. Set the oven temperature to 425ºF and bake for 20 minutes. Reduce the temperature to 375ºF and bake until the popovers are golden, 10 to 15 minutes more. They should be crisp on the outside. Quickly pierce each popover with the tip of a small knife to release the steam. Return the popovers to the oven for 2 minutes for further crisping, then remove and serve immediately.
 
SHARE:

Sunday, August 10, 2014

{Cool Down}: Cantaloupe-Basil Granita


I love being a Southern girl, there's no disputing that--and with the exception of two unforgettable stints away (one in Spain and another in Washington, D.C.), I've always called the South home.  So after a literal lifetime of hot, humid summers, one might think that adjusting is no big deal.  To that, I'd have to say think again.  With each passing summer, I'm no more adjusted and always seeking ways to chill out--literally!

Besides beaches, pools, and all the air-conditioning that I can amass, my favorite way to bring the chill factor to my summer days and nights is through the world of cold treats.  And icy, refreshing granita perfectly fits the bill.  Wonderfully versatile, granita can take on practically any flavor profile and serves well as a casual treat, or as an elegant dessert finish to a meal.  

I recently indulged with a Cantaloupe-Basil granita from Williams-Sonoma.  The luscious melon and fragrant basil, accented with a hint of lime, served up just the sweet cool down I was craving.  Now it's your turn to grab a spoon and indulge!

Happy Eating!

Cantaloupe-Basil Granita
From Williams-Sonoma

Ingredients:
30 fresh basil leaves
1/4 cup (2 fl. oz./60 ml) fresh lime juice
2/3 cup (5 oz./155 g) sugar
1 ripe cantaloupe (about 4 lb./2 kg)
 
Method:
Coarsely chop 20 basil leaves; set the remaining 10 leaves aside. In a small nonreactive saucepan, combine the lime juice, sugar and 2 Tbs. water and bring to a simmer over medium-high heat. Simmer, swirling occasionally, until the sugar is dissolved, about 2 minutes. Remove from the heat, stir in the chopped basil, cover and let steep for 15 minutes.

Meanwhile, halve the cantaloupe and scoop out and discard the seeds. Cut  off the rind and then cut the flesh into 1-inch (2.5-cm) cubes.

Strain the basil mixture through a fine-mesh sieve into a blender. Add half  of the melon cubes and pulse a few times, then puree until smooth. Add the remaining melon cubes and pulse a few times, then add the reserved whole basil leaves and puree until the mixture is smooth. Pour the mixture into a 13-by-9-by-2-inch (33-by-23-by-5-cm) glass baking dish. Cover with plastic  wrap, place on a rimmed baking sheet and place in the freezer.

After 1 to 1 1/2 hours, check the granita. When the mixture starts to freeze around the edges of the dish, stir it with a fork, then return the dish to the freezer.  Stir the granita with the fork every 45 minutes or so, until the mixture is completely frozen into icy grains and the texture is fluffy, 2 to 3 hours longer.

Spoon the granita into bowls and serve right away. (The granita is best when eaten within 2 days. If it becomes very hard and dry in the freezer, let it stand at room temperature for 10 to 15 minutes before serving.) Serves 8.
 
 
SHARE:

Monday, January 13, 2014

Spinach, Pear and Pomegranate Salad

Spinach, Pear and Pomegranate Salad
Over the holidays I was on the hunt for the perfect green salad to bring to the table.  Then I recalled one of my recent Pinterest additions that fit the bill perfectly.  It was a hearty, yet elegant, spinach salad that combined sweet pears, a slight tang (and gorgeous color accent) from pomegranate seeds, blue cheese and walnuts, for one spectacular dish.  

I knew it was the salad that I wanted to prepare and share with family and friends, as well as one that I happily carried over into my permanent salad repertoire.  With a few slight tweaks--I substituted the blue cheese for the goat cheese that I had on hand and made a sherry vinaigrette to dress the dish--it has become a new (and likely perennial) favorite.  

Hearty enough for a satisfying bite during the cold weather, scrumptious enough to merit regular menu appearances--and chocked full of nutrients!--you'll love bringing this dish to your table.

Happy Eating!

Spinach, Pear and Pomegranate Salad -- recipe courtesy of Williams-Sonoma

Sherry Vinaigrette
Ingredients:
1/4 cup sherry vinegar
1 teaspoon dijon mustard
1 small shallot, finely diced
1/2 teaspoon honey
1/2 cup extra virgin olive oil
Kosher salt
Freshly ground black pepper

Method:
Whisk together the vinegar, mustard, shallot, honey, and salt and pepper to taste.  Slowly drizzle and whisk in the olive oil.  Drizzle desired amount over salad and toss to coat.  


SHARE:

Tuesday, December 24, 2013

Hazelnut and Cranberry Biscotti

The holiday season and baking go hand-in-hand.  I started baking (and catering) quite a bit during this time of year several years ago, and it has never gone out of style.  It's a wonderful time of year, indeed, for creating and sharing delicious, festive bites like Biscotti.  

Biscotti means "twice-baked" in Italian and the technique of baking them twice yields the crunchy, delectable cookie we all know and love.  Toasted hazelnuts, dried cranberries and orange zest combine to form a truly scrumptious cookie that's perfect for breakfast (dunking in coffee and tea, preferred -:)), snacking, or as a light dessert course.  

However you decide to indulge, you're sure to enjoy this sweet creation and loads of...Happy Eating! 

Hazelnut and Cranberry Biscotti
Ingredients:
1/2 cup (4 oz.) unsalted butter, at room temperature
3/4 cup sugar
2 large eggs
2 teaspoons vanilla extract
1 3/4 cup all-purpose flour
1/2 teaspoon baking powder
1/2 teaspoon ground cinnamon
1/4 teaspoon salt
1 cup hazelnuts, toasted, skinned and coarsely chopped
1/2 cup dried cranberries
1 teaspoon grated orange zest

Method:
Preheat oven to 350 F. 

Place hazelnuts on a baking sheet and toast in the preheated oven for 8 to 10 minutes.  If still in the skin, remove the skin, chop and set aside.

In a large bowl, using an electric mixer on high speed, cream the butter until fluffy and pale yellow.  Add the sugar and continue beating to combine.  Add the eggs one at a time, beating well on low speed after each addition.  Beat in the vanilla on low speed until blended.

Sift together the flour, baking powder, cinnamon, and salt.  Gradually add the flour mixture to the egg mixture and mix on low speed.  Mix or stir in the hazelnuts, cranberries, and orange zest until evenly distributed.  The batter should be very soft.

Turn the batter out onto a generously floured work surface and divide in half.  With well-floured hands, transfer one-half onto a parchment lined baking sheet and shape into a log about 12 inches long and 1 1/2 inches thick.  Place on one side of the baking sheet and repeat with the remaining batter, leaving at least 4 inches between the logs.  (They'll spread as they bake.)

Bake the logs until the edges are golden, about 25-30 minutes.  Transfer the pan to a wire rack and let the logs cool for 10 minutes.  Using a serrated knife, cut the logs, still on the pan, on the diagonal into slices 1/2 wide.  Carefully turn the slices on their sides and return them to the oven.  (If you run out of room, use an additional baking sheet.)

Bake until the edges are golden, about 10 minutes longer.  Let cool completely on the pans on wire racks.  Store in an airtight container.
Recipe adapted from Williams-Sonoma 

SHARE:

Friday, May 4, 2012

Link Love: Cinco de Mayo

Food and celebration go hand-in-hand for most occasions, and the celebration of Cinco de Mayo is no exception.  Mexican cuisine happens to be one of my favorites, so I couldn't let this opportunity to share some great recipes from around the web sit idle.

Whether you're looking for a hearty tamale pie, the perfect taco, a sweet treat, or something wet to wash it all down, this edition of Link Love has you covered for the best in Mexican fare--and entertaining.

So here's to freedom, celebration--and Happy Eating!


Taco Recipes for Every Appetite (Bon Appetit)

Hearty Tamale Pie to Please a Crowd (Williams-Sonoma)

A Refreshing Sip: Tamarind Cooler  (Gourmet)

Mango-Chile Ice Pops (Saveur)

Festive Decor via DIY Pinatas (Refinery 29)


SHARE:

Friday, March 23, 2012

Homemade Pizza

I still remember the first time I made pizza at home--aside from tossing a frozen pie into the oven.  I excitedly purchased fresh pizza dough, gathered a variety of toppings and the assembly fun ensued.  I was a proud cook as the resulting pizzas (one red and one white) were admired and consumed by family.  It was a good day, and I knew a tradition had been born.  

That was just the beginning, however, because just when I thought it couldn't get any easier or more gratifying--it did.  A short while after that first homemade revelry, I became a culinary instructor at one of my favorite homes away from home, Williams-Sonoma.  And shortly after that, I was scheduled to teach a technique class on all things pizza, which included homemade--as in from scratch--pizza dough. Before teaching this class, I hadn't considered making my own dough, and after it, I've never considered not making it.  Reason being, as most devoted foodies will attest, the thrill of actually making something homemade--and making it well--somehow always trumps the alternative.

There are few recipes that are simpler and yield themselves to multiple interpretations as this pizza dough recipe.  With a few basic ingredients, and the kitchen work horse known as the food processor, you'll be set to enjoy as many varieties of this Italian classic as your creative tastes will allow.  Savory. Sweet. Grilled. Baked. The possibilities are endless--and that's just the way I like it.  I think you will, too.

Happy Eating!


Food Processor Pizza Dough
Williams-Sonoma Kitchens
Mixed in a food processor, this dough comes together quickly.  Be sure to check the expiration date on the yeast; if it is outdated, the dough will not rise properly.

Ingredients:
1 tablespoon active dry yeast
1 teaspoon sugar 
1 cup warm water (105 degrees to 115 degrees F)
3 cups all-purpose flour
1 teaspoon salt
2 tablespoons extra-virgin olive oil

Method:
In a small bowl, dissolve the yeast and sugar in the warm water and let stand until foamy, about 5 minutes.  

In the bowl of a food processor fitted with the dough blade, combine the flour and salt and process with 3 or 4 pulses.  With the motor running on the dough speed, slowly add the yeast mixture, allowing each addition to be absorbed before adding more.  Continue processing until the dough forms a ball and cleans the sides of the bowl, about 1 minute, then process for 1 minute more.  

Coat the inside of a large bowl with the olive oil and place the dough in the bowl.  Cover with a clean kitchen towel and let the dough rise in a warm place until doubled in size, about 1.5 hours.  Divide the dough in half and roll out on a floured surface.  Makes two 12-inch rounds.


SHARE:

Tuesday, February 21, 2012

A Piece of Cake: Curing the Cake-Making Blues

Baking a cake can be exhilarating, especially when the end product turns out they way you planned in both look and taste.  BUT for those occasions where something's not quite right--uneven layers, lack of moistness, etc.--it can leave the most dedicated bakers scratching their heads and wondering what went wrong.  

To help you avoid the latter scenario, I'm sharing some cake baking tips from the pros that are sure to make your next baking adventure the most satisfying and scrumptious one yet.  It might even qualify for perfection!

Start by solving your cake-making blues and wrap up by mastering how to cut perfect layers.  From there you'll be all set to enjoy...Happy Baking!  


SHARE:

Saturday, December 31, 2011

New Year's Entertaining: The Essentials


When planning your next big celebration (hint: New Year's), incorporate these essentials for an affair to remember!

1. The Perfect Bite: Delicious, elegant and easy bites, like Williams-Sonoma's Smoked Salmon Trio, will keep you and your guests satiated without the fuss of a formal meal.

2. A Signature Drink: Select a signature drink for your event, like this Lemon-Orange Fizz Mocktail, to keep the festive air high and the "bar" duty minimal.

3.  Gorgeous Flatware: Add a splash of unexpected flair that's sure to keep the conversation flowing, like gorgeous glassware or flatware. Feature here: Anthropologie's Bronze Age Flatware.

4.  Plates en Masse:  Having enough dinnerware to go around means never having to leave guests for mid-party kitchen duty.  Pottery Barn's Caterer's 12-Piece Dinnerware Set is the perfect stash for intimate affairs.

5.  Ambiance:  Nothing says--or creates--ambiance like the perfect lighting.  Use candlelight to enhance your setting and create the perfect mood and decor with these beautiful small hurricanes from Crate & Barrel.

6.  More Ambiance:  Just when you thought you had the perfect atmosphere in place, you must remember to seal the deal with a beautiful fragrance, such as Henri Bendel's Fragrance Reeds in (my favorite) Fig.

Happy New Year--& Happy Entertaining!
SHARE:

Saturday, October 29, 2011

Spicy Goodness!: My Guest Chef Turn at Williams-Sonoma

For many, the mention of spice connotes heat--and little more.  And while spice can be a carrier of heat in some instances, it is only one facet of its many variations. In fact, the world of spice is a broad spectrum that encompasses sweetness, smokiness, depth, richness, intensity of flavor, and much more--along with that most familiar characteristic, heat.

And on last Saturday afternoon, I had the privilege of celebrating the world of spice during my guest chef event at Williams-Sonoma.  With the Fall season upon us and the cooler temperatures in tow, I wanted to showcase recipes that resonate warmth, along with bold, delicious flavor.  In short, I wanted to serve my own brand of spicy goodness!  And I'm pleased to say that I did.
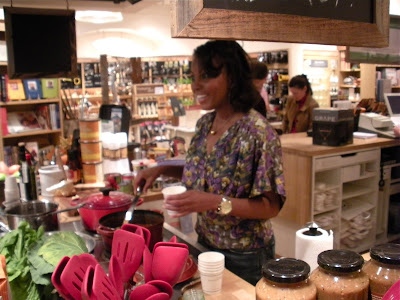
Serving up tasting samples and engaging the crowd

It was such a thrill for me to bring D.M.R. Fine Foods to the Williams-Sonoma customer base, as well as to my dear friends, clients, family and "fans" who came out, and to fulfill my passion for sharing all things culinary.  I loved every moment of the event, most especially my interaction with the lively, inquisitive and fun group.  From my cooking demonstration, to informal Q&A, to the tastings and immediate (positive) feedback, it was a grand time in keeping with Williams-Sonoma's tradition of grand cuisine. 

As I purposed, we talked of--and tasted--the world of spice.  And now I'm thrilled to similarly unfold that world to you here on DMRFF by sharing that day's recipes; ones that are sure to become favorites in your dining and entertaining repertoires.  You can also check out a few additional photos from that day's event here.

So here's to spicy goodness (as featured below in three delicious recipes which were a big hit!)--and, as always, Happy Eating!

Spicy Three Bean Chili

Ingredients:
2 tablespoons olive oil
1 large onion, chopped
3 garlic cloves, minced
1 bell pepper, diced
1 28-ounce can crushed tomatoes
1 8-ounce can tomato sauce
12 oz. water
1 ½ tablespoons chili powder
1 tablespoon cumin
1 tablespoon garlic powder
1 tablespoon sweet paprika
1 ½ teaspoons cayenne pepper
Salt
2 chipotle peppers in adobo sauce, diced*
1 15oz. can chili beans
1 15oz. can black beans, rinsed and drained
1 15oz. can cannellini beans, rinsed and drained
1 ½ cups frozen corn kernels
Several splashes of Tabasco sauce (optional)

Instructions:
Pre-heat olive oil in a heavy bottomed pot under medium heat.   Add the onion, bell pepper and ½ teaspoon salt.   Cook until vegetables begin to soften, about 5-7 minutes.  Add in garlic and cook for another minute. 

Add crushed tomatoes, tomato sauce, water, spices and seasonings, chipotle peppers, 1 teaspoon salt and Tabasco.  Stir until mixed thoroughly and bring to a boil.  Cover, reduce heat to low and simmer for 25 minutes, stirring occasionally.  Add in corn and beans and cook for an additional five minutes.  Serve and enjoy!

*Cook's Note: If you want to temper the heat factor in this spicy chili dish, you can reduce the amount of chipotle peppers or, omit them altogether.
**This recipe converts perfectly into a turkey, chicken, or beef chili.  Simply add in 1 1/2 to 2 lbs. of your meat of choice when you begin sauteing your onions and peppers and allow meat to brown thoroughly. 


Sugar, Herbs and Spiced Nuts
Ingredients:
2 cups assorted nuts, roasted
1 1/2-2 tablespoons butter
¼ cup brown sugar
½ teaspoon cumin
½ teaspoon allspice
¾ teaspoon cayenne
½ teaspoon herbs de Provence
1 teaspoon sea salt
2 tablespoons water

Instructions:
Preheat oven to 350° F

Place nuts on a baking sheet and roast for 10 minutes.  Remove from the oven and set aside.

Mix spices, salt and herbs and set aside.  Put butter in a large skillet over medium heat and as it melts add in sugar, spice blend and water and stir together until a glaze forms, about 1-2 minutes.

Turn off heat and add roasted nuts to the skillet.  Toss nuts until they are completely coated.  Pour glazed nuts onto a foil-lined baking sheet and spread out into one layer to prevent clumping.  Allow glaze to set for 10-15 minutes.  Serve and enjoy!

*Note: Nuts should be stored in an airtight container to preserve freshness.


Hot Mulled Cider
Enjoy this warm and delicious sip from the DMRFF recipe archives: Hot Mulled Cider.


SHARE:

Tuesday, October 4, 2011

Join Me as Williams-Sonoma's Featured Guest Chef!

I was recently invited to be Williams-Sonoma's featured Guest Chef on Saturday, October 22, 2011, from 2-4pm EST at Lenox Square Mall, Atlanta, Georgia--and I want you to be my guest!

I'm excited to collaborate with one of my favorite gourmet food brands to share my love for the world of food--including a cooking demonstration, recipes, tastings and more!

So mark your calendars and make plans to join me for a fun afternoon of yummy eats and inspiration.

I hope to see you there!

XO, Dawn


Venue Details:
WILLIAMS-SONOMA
LENOX SQUARE
3393 PEACHTREE ROAD NE
ATLANTA, GA 30326
(404) 812-1703
SHARE:

Wednesday, August 10, 2011

Taste Makers: The Artisans' Market at Williams-Sonoma

Honey from Savannah Bee Co.
Last weekend I dropped by the Artisans' Market at my local Williams-Sonoma and enjoyed some delicious bites from some of Atlanta's talented local artisans.  Not only was it a pleasure to sample the tasty fare, but equally to my liking was the opportunity to meet the people behind the food.

From the Italian delicacies of Bella Cucina to the exquisite chocolates of Cacao Atlanta to the Southern delights of Phickles Pickles--and many more--it was a true foodie haven.  Between sharing our passions for food, snapping pics, and hearing about all the new and exciting ventures that these taste makers have on the horizon, it was an indulgent way to spend a portion of my Saturday afternoon.  And it felt good supporting our local producers so that they can continue to pursue their dreams and so that we can continue to enjoy the fruits of their labor.

I'm excited to see what's next for the many and varied local artisans who are making bold, delicious food statements.  I'll be watching because surely it will fuel my Happy Eating!


More photo highlights from the Market:

Delicious teas from Braswell's
The ladies of Bella Cucina
Posing with culinary icon, Chef Virginia Willis

Click here to see all of the great photos from that day!

SHARE:

Thursday, April 21, 2011

Pastry Chef's Baking Tips

If you've ever asked questions like, "what constitutes a bad egg?" or "my recipe calls for cake flour, but I only have all-purpose, what to do?", then you're not alone.  In the world of baking, often equated to a science, there is no dearth of "do's and don'ts".  And because each "rule" is significant to the final outcome, you don't want to side-step or break any.  Like a typical science project, one false step could cost you dearly.

So, not to worry, your help has arrived.  These pastry chef tips, courtesy of Williams-Sonoma, will answer some of your most pressing baking questions and put you on the road to baking rockstardom!


Now....start your ovens and, of course, Happy Eating! 

Pastry Chef's Baking Tips
  • If you are unable to find cake flour, you can substitute all-purpose flour.  It is heavier, however, so you need to adjust the amount.  Use 3/4 cup sifted all-purpose flour plus 2 tbsp. cornstarch for every 1 cup cake flour.
  • To test if butter is at room temperature, lightly press on it with a clean fingertip.  If it leaves an imprint, the butter is ready to use.
  • If you are unsure about the freshness of your eggs, put them in a bowl of cold water.  If the eggs sink to the bottom and lie on their sides, they are fresh.  If they float or stand on one end, the eggs are at their prime.
  • To bring cold eggs up to room temperature quickly, put whole eggs in a bowl of lukewarm water (hot water might cook them) for 30 minutes.
  • If tiny egg shell fragments fall into the bowl of egg whites or yolks, use an emptied shell to scoop up the fragments, which will readily cling to the shell.  This technique is more effective than using your fingers or a spoon or knife tip.
  • Salt helps to bring out the flavors in sweet baked goods.
  • Cream of tartar is used in angel food cakes primarily to stabilize the egg whites, but it also lowers the pH of the batter, resulting in a whiter crumb.
  • A dark pan absorbs heat more readily than a light-colored one and can cause delicate cakes to overbrown.  If using a dark pan, watch the cake closely as it bakes.  You may need to reduce the oven temperature or shorten the baking time.
  • Don't open the oven door during the first 15 minutes of baking any cake.  Changes in the air pressure or temperature can prevent the cake from rising properly.
  • If the parchment paper used to line the pan sticks to the bottom of the cake, dip a pastry brush in warm water and lightly brush the paper.  The water should loosen it, making it easier to remove without damaging the cake.
  • To protect the top of a cheesecake when covering it for chilling, invert a large plate over the top of the pan before wrapping in plastic wrap.   
SHARE:

Tuesday, January 25, 2011

A Sharp Knife Makes for a Sharp Cook!

My knife collection is one of the biggest treasures of my kitchen.  I prefer them any day over all the "specialty" gadgets that you can find for everything from pressing garlic to peeling a banana.  Not to belittle gadgets (I happen to be a junkie), but when it comes to the raw, get-down-to-business, "I'm really cooking!" energy and thrill that I love, there's nothing quite like my knives.  My sharpened knives, to be exact.

Caring for your knives should be viewed as an investment, after all most good ones will run you more than a few cents.  And the pay-off isn't short-lived.  Proper care of your knives can mean years of blissful cooking --and you can guess the results of improper care.  Keeping your blade aligned and sharp is what you want to maintain from the first use to the last.  With just a little attention to detail, it's easy to preserve one of your best cook's tools.

To help you in this quest, I've outlined some tried and true tips on knife care, along with a resource guide for professional care options. 

********

Cleaning:
This one is short and sweet:  hand-wash knives only!  (And carefully, I might add.)  Dishwashers will certainly dull your blades and quickly destroy your knives.  Also be sure to dry them thoroughly after cleaning and store in a butcher block or casing which will protect the blades between uses. 

Honing:
Most knives bought as a set will include a honing steel.  If you don't own one, however, it's worth the investment.  It's recommended to hone your knives following each use to keep the blade aligned  between professional sharpenings.

Professional Sharpening: 
About once a year (for the active home cook), you'll want to have your knives professionally sharpened to ensure optimal alignment and sharpness.  To get you on your way, I've highlighted a few Atlanta area vendors that will sharpen your knives.  Outside of the Atlanta area, check with similar establishments for service options. 

1.  Williams-Sonoma - WHERE & WHEN: Phipps Plaza, Lenox Square and Northpoint; for all other locations call in advance to verify.  Drop off knives in time for sharpening on Mondays.  Same day pick-up is usually available; COST: Prices vary but usually range between $4-$8/knife, depending on length and dullness of blade.  

2.  The Cook's Warehouse - WHERE & WHEN: Midtown- Tuesdays & Thursdays, Decatur-Wednesdays, and Brookhaven- Fridays; COST: $4.50/straight edge, $6.00/serrated edge, also will do kitchen scissors/shears.  Drop off in advance on or before the designated day for same day pick-up.  A store clerk will call to confirm when knives are ready and they can be held securely at the store if immediate pick-up is not an option.

3.  Sur La Table - WHERE & WHEN:  Perimeter Mall, Upper Level, drop-offs accepted any day of the week, however they must be left with the store for at least one day before available for pick-up; COST: $1/inch.

********

With these tips and resources in hand, now all that's left to do is to get to cooking! 
SHARE:

Monday, November 15, 2010

Turkey Love: Preparation Tips

For most meals that are served on Thanksgiving Day, the turkey is the undisputed main attraction.  With that in mind, I want to share a few, simple tips that will help you achieve a moist, well-seasoned, and above all--delicious--roasted turkey.

Be Kind and Brine
Brining your turkey is nothing short of "turkey love".  I began brining a couple of years ago and won't ever roast another turkey without this moistening, flavor-enhancing step.  To brine your turkey in preparation for roasting, you'll want to submerge it in the brine solution (typically water, part salt, part sugar and any other flavorings of your choice) and keep it in the refrigerator until you're ready to handle further.  (Brining bags make this process a cinch and can be at found at your local grocery store or gourmet food stores like Williams-Sonoma and Crate and Barrel.)  Finally, rinse your turkey and pat dry before preparing for the oven.

Be Liberal With Seasoning
There's no shortage of ways to season your big bird. From the classic salt and pepper duo to flavored butters, herbs, citrus and aromatics, the list goes on and on.  So whatever your pleasure, be sure to give your turkey even more love and season it liberally on the skin, inside the cavity and even underneath the skin.  Your taste buds will thank you later.

Smart Basting
This next tip is one I learned from Martha Stewart.  Once you've seasoned your turkey to your liking, take some cotton cheese cloth (about four layers), soak it in your basting liquid, squeeze and then place over the turkey breast.  Continue basting about every 30 minutes until done.  The cheese cloth will protect the breast meat from overcooking and darkening too quickly and also keep it moist.  Remove it for the last hour of cooking and cover any overly dark areas with foil to prevent burning.  The result will be a beautiful, lacquered turkey that is a feast to the eyes and mouth.

Use the Whole Bird!
Before you're tempted to discard the turkey neck or giblets that are found in the turkey cavity, set them aside and use them to flavor your stock for basting and gravy.

Give It a Rest
Once you remove the turkey from the oven, let it rest for twenty minutes or so before carving to allow the juices to redistribute.  This will ensure your turkey remains juicy and all your hard work isn't lost.

Tools of the Trade
If you haven't already, invest in a kitchen timer (or two) and an instant read thermometer.  You don't want to "wing it" and try and guess when your turkey is done.  The rule of thumb generally is about 12 minutes for every pound of turkey, but always check to make sure it's done.  Test for doneness at 165 degrees in the thickest part of the thigh.  Nothing short of "well done" is acceptable when you're dealing with raw poultry.

So there you have it.  I hope you'll use these simple tips to transform your turkey into a bird that's nothing short of your best turkey ever!

Happy Eating!
SHARE:
© D.M.R. Fine Foods. All rights reserved.
MINIMAL BLOGGER TEMPLATES BY pipdig