Monday, November 6, 2023

Deck the Halls Mocktail + A Holiday Recipe Exchange!

This year, I'm excited to take part in Eat the Culture’s 2023 Holiday Recipe Exchange: Party Pairings for All the Holidays! Holidays often revolve around communal moments – sharing stories, laughter, and, of course, food. This year's roundup is all about those delightful 'lite bites' and drinks that set the tone for festive gatherings.

I had the pleasure of partnering with Ashley of Pink Owl Kitchen who crafted delicious New Orleans BBQ Shrimp. This dish pairs perfectly with my Deck the Halls Mocktail. 
Learn more about Eat the Culture and find a complete list of recipes from all participants here.  Share these recipes with your friends and loved ones and follow each participant by using the hashtags #HolidayswithETC, #PerfectPartyPairings, and #ETCHOLIDAYS2023  on Instagram.  


And speaking of the holidays, they have always represented the time of year where my favorite things combine (faith, family, friends--and food!) and ignite my merry-making.  With the backdrop of the world today, I'm anticipating the upcoming holiday season more than ever.  

And to celebrate the many special moments, gatherings, soon-to-come memories, and merriment, I'm toasting to this season--and decking the halls!--with a festive, effervescent and beautiful sip.  Cue my easy and fun Deck the Halls Mocktail. 

I'm talking a worthy signature drink (for easy entertaining) that's adaptable for any occasion from a kids' party, to a Girls' Night, to Thanksgiving, Christmas, New Year's Eve, and beyond.  It's the drink that you'll love to sip and serve, again and again.  It's been in my holiday repertoire for a couple of holiday seasons now, and I'm thrilled to share and make your holidays all the merrier, brighter and tastier.  


A really special wow factor happens to be the festive ice cubes that serve the double duty of both chilling—and adorning—this drink.  Like mini frozen ornaments, they boast orange, rosemary, cranberry, and star anise.  A beautiful compliment to the gorgeous drink hue, these ice cubes elevate this drink and make it a feast for the eyes.

So now that we’re agreed that this will be making the rounds during the holiday season, let’s cheers to safe, festive… 

Happy Sipping!

Deck the Halls Mocktail

Ingredients:

Festive Ice Cubes* (recipe to follow)

Ginger beer

Grenadine syrup

Orange slices  

Maraschino Cherries


Festive Ice Cubes:

Ingredients:

Cranberries (frozen or fresh)

Orange Slices

Fresh rosemary sprigs

Star Anise

Water

Special Equipment: Ice cube tray/mold


Method:

Place cranberries, an orange slice, rosemary sprigs and star anise into an ice cube mold or tray compartments.  Add water and freeze overnight.


Add festive ice cube(s) to a glass.  Pour over ginger beer.  Add a splash or two of grenadine. Garnish with orange slices and cherries. Enjoy and cheers to a fabulous holiday season!


SHARE:

Friday, December 23, 2022

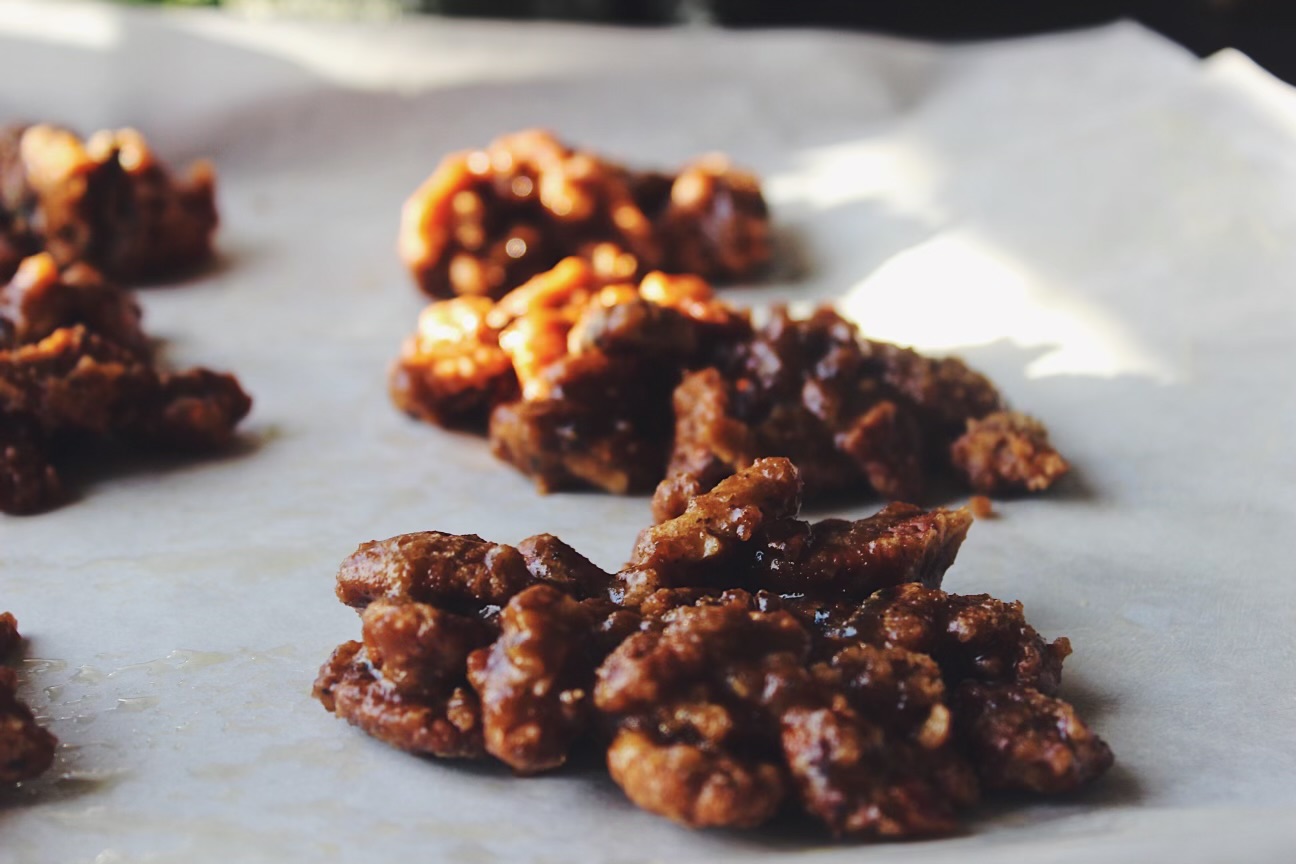
Pralines


When New Edition sang the song, Candy Girl, they were singing to me—and my unabashed sweet tooth.  To say I love candy is the greatest of understatements, because I actually looooove candy.


And when it comes to these confectionery delights, I especially enjoy them during the holidays.  Growing up, my mom always set out her glass candy jars filled with candies for my sister and me, along with family members and “dropper-byers”, alike, to relish.


Then something really special happened exactly 15 years ago, when D.M.R. Fine Foods was born during the holiday season.  And our inaugural offering?  A Holiday Sweets & Treats menu filled with sweet and savory goodness, including decadent homemade candies.


So it’s no wonder that I was inspired to bring another candy recipe to life in my kitchen last weekend—inspired by my latest jaunt to New Orleans this past Summer—and the tastes that have long been favorites of my pecan-loving family.


Pralines.


So unbelievably easy and quick to bring together, you can make and nosh on these goodies whenever your heart and palate desires.  I gifted most of my batch (a bit selfishly motivated by the consequences of keeping them on hand in my home and the residual fallout to my waistline), so you can do the same for friends, family, colleagues—or just enjoy them all to yourself, if you’re not willing to part with the nutty, decadent goodness.


This recipe rendition hails form the New Orleans School of Cooking where I spent an afternoon learning more about the history, culture, people, cuisine, and techniques that make Creole and Cajun cuisines so exceptional, while watching classic dishes come to life, and eating to my heart’s content.


So here’s to making your holidays—and beyond—extra sweet and to Happy Eating!


Pralines


Ingredients:

1 1/2 cup sugar

3/4 cup light brown sugar, packed

1/2 cup milk

6 tablespoons butter (3/4 stick)

1 1/2 cup pecans (roasted optional—but recommended)

1 teaspoon vanilla extract


Special Equipment:

A Candy Thermometer


Method:

Combine all ingredients in a medium saucepan and bring to a boil achieving “softball stage” (*238-240 degrees) Cook’s Note: watch carefully to avoid sticking and burning on the bottom.


Remove from heat.  Stir until mixture (stirring constantly) becomes creamy and cloudy, and pecans stay suspended in mixture.  Spoon out on buttered waxed paper or parchment.  Enjoy!

Cook’s Note: when using waxed paper, be sure to buffer with newspaper underneath, as hot wax will transfer to whatever is underneath.


Roasted Pecans: Bake them on a sheet pan at 275 degrees F for 20 to 25 minutes, until slightly browned and fragrant.


Options:  Praline Sauce (add 1/2 cup corn syrup to mixture.)  Chocolate covered praline candy.  Flavored pralines (chocolate, coffee, brandy, etc.)


**Makes 1-50 Pralines depending on size.


*Recipe adapted from the New Orleans School of Cooking


SHARE:

Sunday, November 13, 2022

{Star Ingredient Round-Up}: Butternut Squash 3 Ways


Inspiration and preparation remain two of my very favorite ‘super powers’ and especially so when it comes to the big wide world of cooking.  Added emphasis when cooking for an occasion, a special someone(s), or to simply make good use of the food that’s been lingering in my fridge, on my countertops, and in my pantry.


Enter the genius I affectionately label as star ingredients.  Translation: one ingredient transformed in myriad ways and dishes.  As we make our way into the holiday season, I want to share a few variations on one of my absolute favorite seasonal ingredients, butternut squash.


My round-up includes recipes that can deliver as exceptional side-dishes, main courses, and appetizers:


Hasselback Butternut Squash with Maple Butter


Butternut Squash Galette


Butternut Squash Soup


Want more of this delicacy?  Simply search butternut squash and enjoy even more…


Happy Eating!


SHARE:

Thursday, December 23, 2021

Merry Christmas + Homemade Biscuits


Holidays and baking go hand-in-hand for me, so this past Sunday, I decided to slow down and finally bake homemade biscuits.  Yummy, right?!  

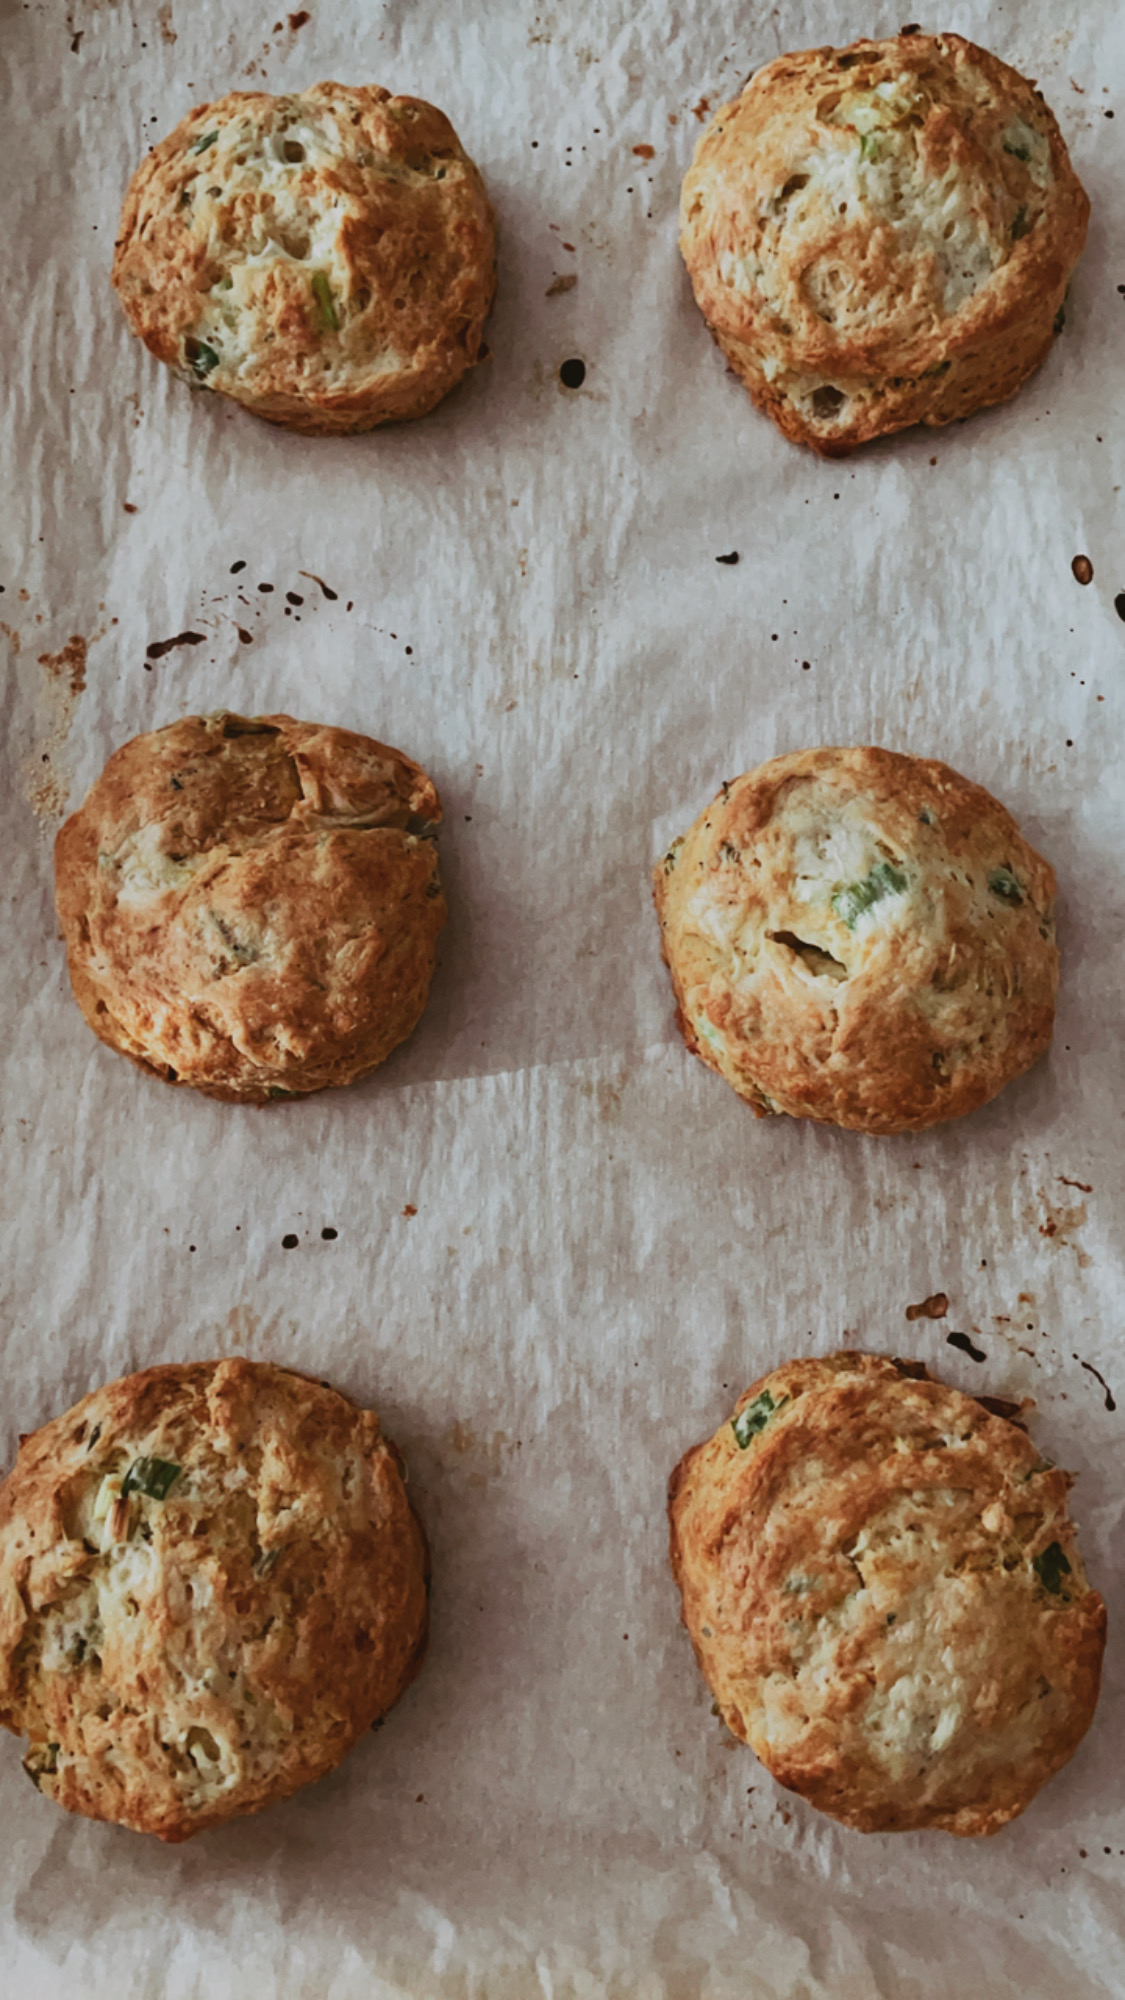
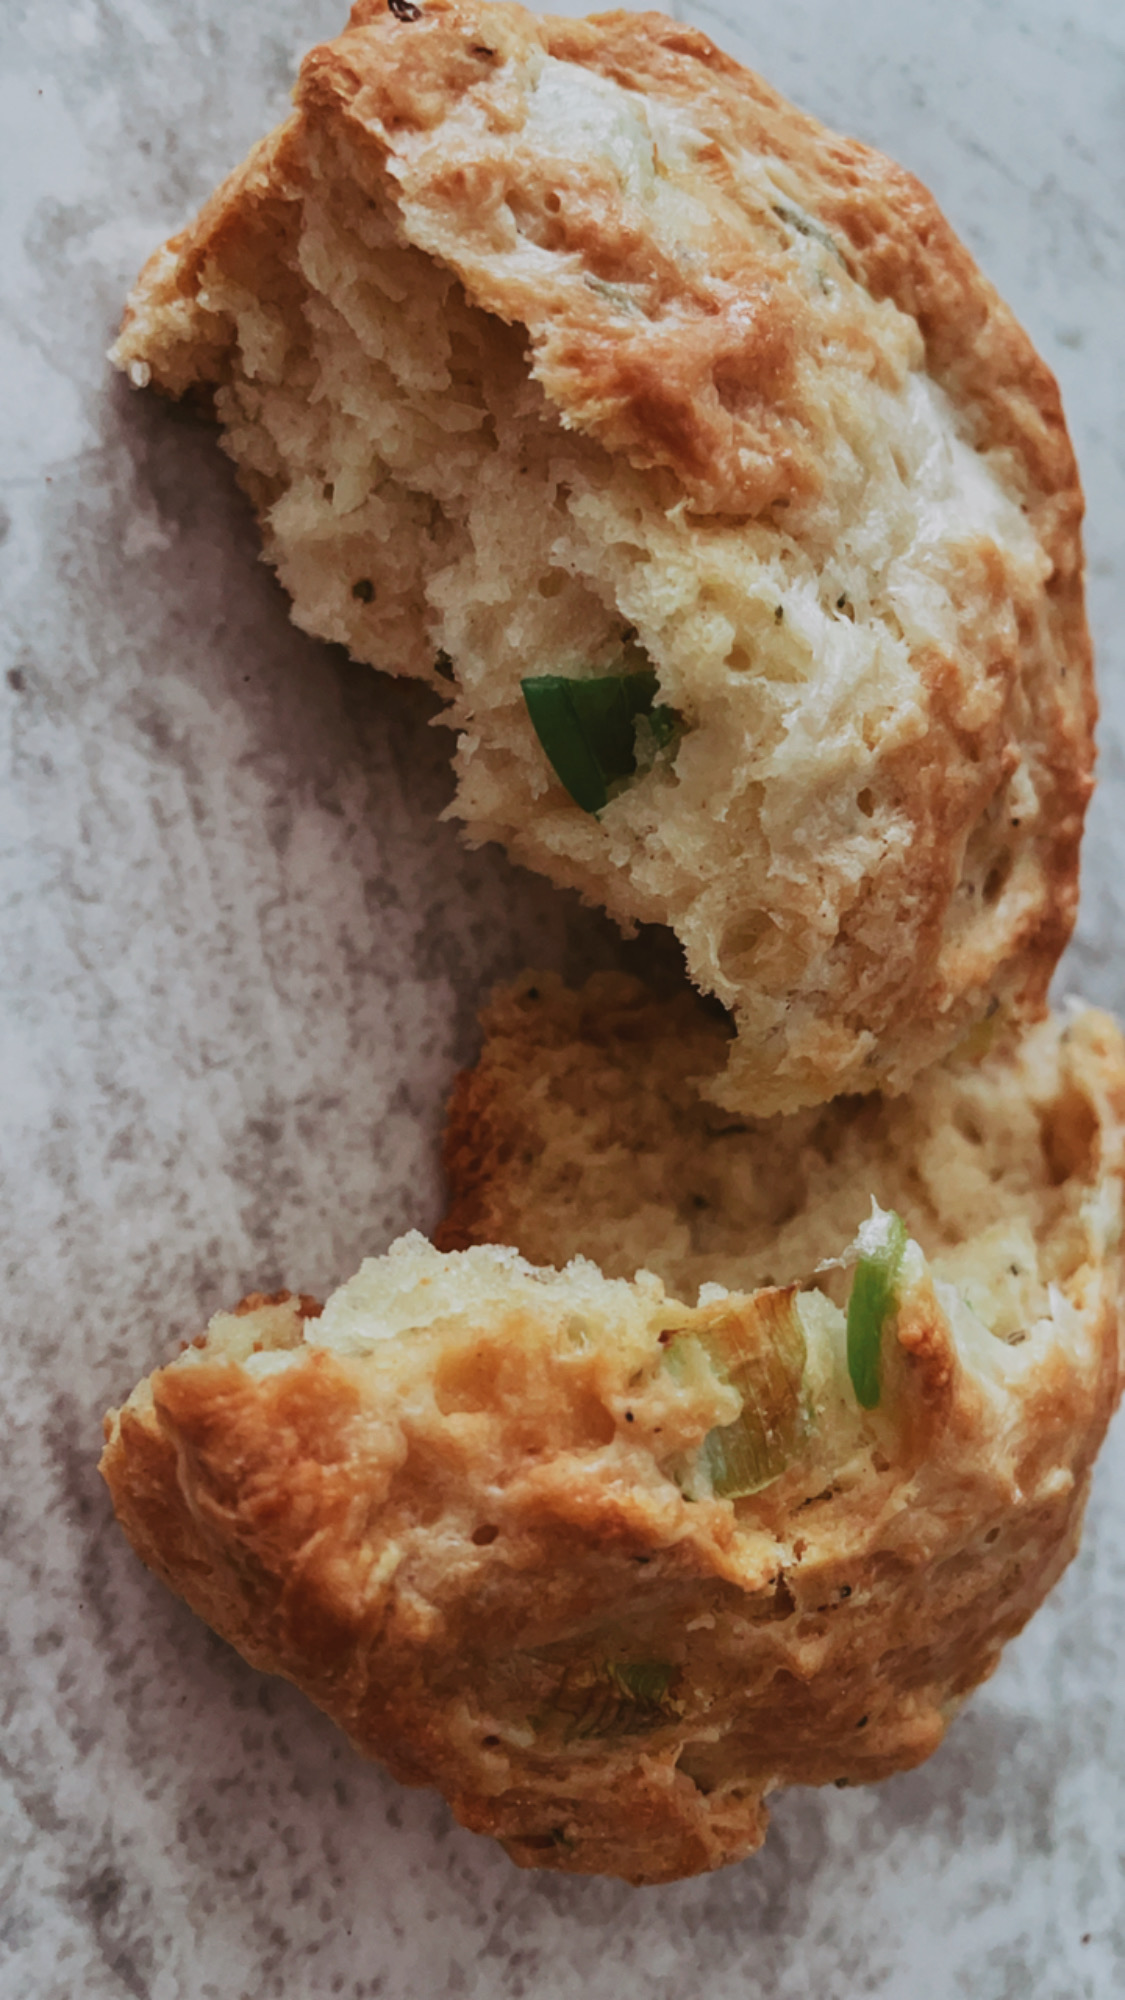
They truly were, with a savory, herbaceous twist, that makes them great for devouring morning, noon or night (i.e. for breakfast, brunch or dinner).  So with that said, I wanted to share the recipe with you in case you decide to follow my lead and bring them to your holiday eating repertoire.  

I'd actually been eyeing these since I saw the recipe in my November issue of Bon Appetite magazine, so it felt good to finally bring them to life in my kitchen. I'm so thrilled to say that they didn't disappoint.  To the contrary, they came out wonderful--with beautiful layers (the hallmark of a great biscuit, no?) and are easy to bring together.


I baked a few to enjoy and photograph for the blog :) and froze the rest of the batch for homemade biscuits on demand, whenever the notion--or craving--hits.  

So whenever you decide to bake them, I hope you experience the same Happy Eating.

Blessings for a Merry Christmas!

xx, Dawn

Stuffing Biscuits 


SHARE:

Thursday, November 4, 2021

Hot Skillet Cornbread


Food has always been a love language in my family. From my earliest memories, I recall the rallying call it represented to gather, nourish, strengthen bonds and demonstrate affection.  


My grandmother, in particular, would often call us and read off her dinner menu, ending with the invitation to come over and share in the bounty. It was code for, “I want to see you and spend time with you and share my love for you.”  And no few times, whether the menu was on the grander scale, or relatively modest, skillet cornbread was on the menu.  


I can still see her pulling a hot cast iron skillet from the oven with the same common touch that one might give to grabbing a pre-made dish from the fridge.  It was such a common occurrence that it’s forever etched in my memories—and heritage.  Similar scenes were recreated by my mom in our home, albeit on a less frequent rotation due to working mom life.)


There were other variations of cornbread that my grandmother served, like cracklin cornbread, prepared stovetop with cracklins mixed into the cornmeal batter that was fried in hot oil, yielding a savory pancake-esque bite, only crispier and more satiating.  Still, my favorite was the hot skillet cornbread that often stood, very well I might add, on its own as the bread course—making everything from collard greens and pot likker, to fried chicken, chili and more, that much better.  Hot, buttery, tender crumbs, with crispy a top and edges, have a way of doing that.


And then there was the reincarnation into phenomenal cornbread dressing, another family staple, served mostly during the holidays.  As traditions go, I've kept this one alive with my slightly adapted iteration of this forever family (and cultural) staple in my kitchen.  From stuffed cornbread, to cornbread dressing, to herbed cornbread madeleines, or on its savory, delicious lonesome, cornbread will always have a place in my heart and home.


I’m sharing this recipe with all the sentiments of love and togetherness that it represents for me, and I hope you take it, enjoy it, and create your own fond memories filled with…


Happy Eating!


Hot Skillet Cornbread


Ingredients:
1 stick (8 ounces) unsalted butter
1 1/2 cups cornmeal
1 cup flour
1/3 cup sugar
1 tablespoon baking powder
3/4 teaspoon kosher salt
1 1/2 cups milk
2 large eggs 

Heavy drizzle of honey (optional)

Instructions:

Preheat the oven to 400 degrees F.  Add butter to the skillet and place in the preheated oven for approx. 8 minutes, until butter is melted and golden.  

While the butter is melting and the skillet is heating through, in a medium bowl, add the cornmeal, flour, sugar, baking powder, and salt, and stir to combine. To the large bowl, add the milk, eggs and honey (if using). Toss in the dry ingredients into the wet ingredients and stir until just combined. 

Pour or spoon the batter into the skillet.  Bake for 20-22 minutes, until the cornbread is golden brown and the edges are browned (don't overbake!).  Remove from the oven, serve warm and enjoy! 


Baker's Note: Cornbread used for dressing can be made ahead and stored in the freezer for up to a month.


SHARE:

Friday, December 18, 2020

Holiday Eats: Sugar and Spice Straws with Orange and Walnuts


I can barely think 'holidays' without thinking sugar and spice and everything nice.  So when I stumbled upon a sugar and spice rendition of classic cheese straws, you can guess my elation--and equal determination to bring them to life in my kitchen.

This past weekend, I made good on that promise and spent a sunlit Sunday afternoon baking these delicacies, while singing and bopping along to tunes from my Christmas playlists, while relishing the fragrant wafts that filled my kitchen.  (And because you know how seriously I take self care, creating moments of happy and bliss, like this, are a priority.  And even more so against the backdrop of 2020.  So remember to take time to be good to you.)


Back to the recipe, it marries the warmth of five spice and cinnamon to bright citrus--and sugar, of course. :) As an added bonus, walnuts give great texture, along with nutty goodness, and flaky puff pastry brings it all together.  So as you're warming your oven in the days ahead, add this easy recipe to your repertoire.  The results are gorgeous, to boot, so no one has to know what a cinch they were to make.  It'll be our little secret.

And if I haven't raved enough already, you can serve them any number of ways, from cocktail party bites, as a part of a cheese board, paired with bubbly, or as an anytime snack.  


However you indulge, you're in for...Happy Eating!

Sugar and Spice Straws with Orange and Walnuts

Ingredients:

3/4 cup sugar

2 tablespoons five spice powder

1 teaspoon cinnamon

Zest of an orange

1/2 cup walnuts, finely chopped 

2 sheets frozen puff pastry, thawed


Method:

Preheat oven to 400 degrees F

In a small bowl, combine sugar, five spice and cinnamon.

Roll out each pastry sheet to approximately 11in. square (no need to stress; just do your best, like I did!) Sprinkle half the sugar mixture evenly on one sheet. Follow with walnuts and orange zest.

Take the second sheet and lay directly on top of the first sheet.  Sprinkle remaining sugar mixture on top. Use rolling pin and roll out further (you'll also be pressing the sugar into the pastry by doing this) in one direction to form a rectangle that's approximately 11in. x 13in. 

Cut into 1/2 in. strips and transfer to a parchment lined baking sheet. (I used two to space them out.) Hold both ends and twist 3-4 times to form a spiral.  Pinch ends tightly to avoid unraveling while in the oven.  Bake for 15-20 minutes, rotating sheet pan(s) once, until deep golden brown.

Allow to cool on sheet pan.  Serve and enjoy!

Recipe adapted from Peter Som


SHARE:

Tuesday, December 15, 2020

5 Tips for Stress-Free Holiday Travel

Memories from Florence, Italy
 While the prospect of holiday travel can come with excitement and anticipation of enjoying an amazing getaway, it can also bring its unique set of challenges. To help you make the most of your holiday travels (and beyond), here are five tips to keep in tow:

1. Embrace Your Inner Early Bird or Night Owl for Going To and Fro —Planning for very early or very late typically results in lighter crowds and clutter on the road, on the train, or as you’re trying to get through airport security.

2. Pack Light —I’m still working on this one, admittedly, but a lighter load allows for carry-on ease, minimizing the stress (and extra $$) associated with checked baggage in the case of air travel. Plus it’s all-around easier to manuever across multi-destinations.

3. Avoid Tight Connections —Because despite the best laid plans, delays sometimes occur. And nothing shrieks stress like the possibility of missing a connection,

4. Stay Powered Up —If you’ve ever glanced at your phone to see that low battery warning staring back, then you know the angst of not having enough juice for the journey. Make sure your mobile devices and portable chargers are fully powered before leaving home.

5. Get Organized —Gather important documentation, such as passports, boarding passes, itineraries, etc. and keep them organized and easily accessible. In the case of international travel, check sites like the State Department for relevant travel requirements, advisories, country information and related updates.

Now, you’re more ready than ever to enjoy…

Happy Travels!

This article originally appeared on Postcard Travel Boutique

SHARE:

Thursday, November 19, 2020

Pumpkin Spiced Bundt Cake


So my recent baking spree continues.  And this time I’m leaning into an uber moist and scrumptious (truly, truly) Pumpkin Spiced Bundt Cake.  Honestly speaking, if calories and such were simply a figment of the imagination, I’d be baking around the clock.  Because…dessert! :)  But alas, reality bites at times, so I try to do myself the favor of not having too many sweet, homemade delicacies on hand.


Still, the desire to bake (for the first time this year, I realized) a pound cake in my beautiful bundt pan outweighed any aforementioned caution. ;)  And last Sunday made way for joyous moments dedicated to baking (and relishing) this delicious confection.


While I take my pumpkin spice indulgences on the lighter side, the pumpkin helps to make this one of the moistest cakes you’ll ever taste, with a gorgeous color, to boot, and coupled with the warm, flavor-full spices, it goes down nice and easy, bite after bite after bite.  And maybe a little too easily in my case; but hey, we have to take our pleasures as they come, no?


So not one to keep a great thing (especially a great recipe) to myself, I’m sharing this in time for your very own baking indulgence to celebrate Fall, the holidays, or simply continuing to survive the “wonder” that is 2020.  No matter the reason, you’ll be so glad you baked this cake.  And you’ll be overwhelmed with….


Happy Eating!


Pumpkin Spiced Bundt Cake


Ingredients:

3 cups all-purpose flour

2 ¼ cups of sugar

1 can (15 oz.) pumpkin

3 eggs, room temperature

2 teaspoons baking soda

1 cup canola oil

½ teaspoon salt

1 teaspoon cinnamon

1 teaspoon allspice

1 teaspoon pumpkin pie spice

¼ teaspoon ground nutmeg

1 teaspoon vanilla extract

Confectioner’s sugar


Method:

Preheat oven to 350° F.


Grease cake pan liberally (I used cooking spray) and set aside.


In a medium bowl, whisk together flour, salt, baking soda, and spices.  Set aside.


In a stand-mixer, combine the sugar and oil until well blended (2-3 minutes).  Blend in eggs one at a time, incorporating each fully, before adding the next.  Add in vanilla and blend further.  Add in flour mixture, alternating in batches with the pumpkin until all ingredients are blended in.


Pour batter into prepared cake pan and bake in heated oven for 60-65 minutes, or until a cake tester inserted in the center comes out clean, with no crumbs.


Let the cake rest and cool for 10-15 minutes before inverting onto a plate or wire rack.  Dust (I used a small mesh strainer) the cake with as much confectioner’s sugar as desired—and enjoy!

SHARE:

Sunday, November 8, 2020

{Easy Fall Baking}: Apple Crisp


There’s something about Fall that turns up my love for baking.  If I had to put a pulse on it, I’d say it’s the cooler, crisp weather coupled with warm and cozy fare that gets me every time.  Oh, and apple season.

Since forever, apples have been one of my favorite fruits, so it’s a no-brainer that combining them with scrumptious flavors like fragrant spices and citrus make them a star-ingredient in my kitchen.  From tarts, to crostatas, apples and baking are a winning combination for me.


As much as that is true, it was somewhat ironic that I had never baked an apple crisp until this past weekend.  I say ironic because it was a favorite dessert treat growing up.  In fact, I was introduced to apple crisp as a part of the occasional dessert round-up for my school lunches, and although I found most of the lunches to be not so great, and happily farmed mine off to my eager classmates (my mom didn’t appreciate that, lol!), apple crisp was one of the few dishes (along with peanut butter cookies, pizza and burgers) that elicited excitement.  Sounds like a child’s palette, no?


Despite having a grandmother who turned the apples from the apple tree in my grandparents' backyard into decadent homemade apple pies that food dreams are made of, I still fell for those little servings of apple crisp on the lunch trays. And this past weekend, I revived those childhood memories and tastes in my own kitchen, discovering, to my delight, that apple crisp will always do it for me.  (I baked a peach crisp over the summer that was addictively good, so I was biding my time for apple season to finally arrive, so I could recreate the goodness all over again.)


Beyond the memories and delicious indulgence, the ease in which this dessert comes together makes it star-worthy.  With the toss of a few ingredients, it’s oven-ready and primed to be baked to perfection with the bonus of that “something delicious is baking aroma” wafting through your kitchen. 


Served hot from the oven, topped with ice cream for extra decadence (yes, please!), it’s baked perfection in a dish and the best kind of…


Happy Eating!


Apple Crisp


Ingredients:

¾ cup flour

¼ cup light brown sugar

½ teaspoon salt

½ cup plus 2 tablespoons granulated sugar

8 tablespoons (1 stick) unsalted butter, cold, and diced into cubes

1 cup old-fashioned rolled oats

3 lbs. apples (I prefer Granny Smith)

2 tablespoons lemon juice

2 teaspoons cinnamon


Method:

Preheat oven to 375° F.


In a large bowl, mix together the flour, brown sugar, salt, 1 teaspoon cinnamon, and 2 tablespoons granulated sugar.  Cut butter into flour, using a pastry blender or two knives, until mixture is the texture of coarse meal.  Add oats and use your hands to toss and squeeze mixture until large, moist clumps form.  Place in freezer to chill while you prepare the apples.


In another large bowl, toss apples with lemon juice, 1 teaspoon cinnamon, and ½ cup granulated sugar.  Transfer to a 2-quart baking dish and sprinkle with the oat topping mixture.  Place in preheated oven and bake until golden and bubbling, 55 to 65 minutes.  Let cool slightly before serving—and enjoy!


Recipe adapted from Martha Stewart

SHARE:

Wednesday, November 27, 2019

Hasselback Butternutsquash with Maple Butter

Happy Thanksgiving Eve! If you've been taking my advice ;), you're probably well along the path of Thanksgiving prep by now.  But, if I may, I have to share a recipe that really should land a spot on your Thanksgiving--and beyond--menu. Why? Because it's the quintessential perfect dish (translation: comes together easily, is stunning, and tastes ah-mazing!)


If you're like me, then you can't get enough of butternut squash, especially during this time of the year.  And since I've always admired the beauty of the hasselback technique (namely on potatoes), when I saw it done on butternut squash, I knew I had to finally try my hand.  And if my virtual oohs and ahhs are any indication, this one's a definite keeper.  Need more convincing?  This dish now ranks as one of my all-time favorite side dishes. 

So without further delay, here's the recipe for Hasselback Butternut Squash. I finished these with a generous pour of maple butter, chopped walnuts (for a bit of crunch and texture) and sage, for added color and freshness.  Confession: I shared "the making" of these on my instastory feed on yesterday evening (you can watch it in my 'The Holidays' highlights once the stories expire) and took a poll on whether I should share the full recipe in time for Thanksgiving.  The overwhelming majority said they wanted it, so here we are.

Blessings for a Happy Thanksgiving and, as always, Happy Eating!

Hasselback Butternut Squash with Maple Butter

Ingredients:
1 large butternut squash, peeled, halved lengthwise and seeds removed  
Olive oil
Kosher Salt
Freshly Ground Pepper (optional)
1/2 teaspoon ground cinnamon
1/2 teaspoon ground nutmeg
1/4 cup pure maple syrup
2 tablespoons unsalted butter
Chopped walnuts, toasted
Fresh sage, torn in small pieces

Method:
Preheat oven to 425 degrees F.

Peel and prep squash.  Place on a baking sheet and drizzle generously with oil.  Season liberally with salt and bake in the preheated oven for twenty minutes.  Remove from oven and slice the squash in 1/8 in. thick slits without cutting all the way through to keep squash intact.  Cook's Note: place butter knives on either side of the squash to help with the cutting precision.

Sprinkle squash with cinnamon, nutmeg and more salt, to taste.  Return to the oven and bake for an additional 20 minutes.  While waiting, melt the butter in a small saucepan and add in the maple syrup.  Stir to combine and set aside to cool slightly.

Take squash from the oven and generously pour maple butter over it (you can do this on the baking sheet or move it to the serving dish first and then dress with the butter.)  Finish with a garnish of walnuts and sage.  Enjoy!

Dish can be made in advance and stored in the refrigerator until ready to reheat and serve.  

Recipe adapted from How Sweets Eat


SHARE:

Monday, November 18, 2019

Toast With This!: Cider Mimosas

When it comes to stress-free entertaining, one of my hallmark tips is to serve a signature drink--be it a mocktail, cocktail, or whatever suits your sipping fancy. It does the double duty of marking the occasion, while keeping the effort level low, freeing you up to spend more time with your guests--the ultimate reason we gather, no?

So just in time for your Friendsgiving, Thanksgiving, and all around holiday soirees, I've created a delicious, festive sip that's a grown-up twist on one of my favorite seasonal beverages, apple cider.  And with only four ingredients, it couldn't be easier to make--and toast with--my cider mimosas.

Happy Sipping!

Cider Mimosas

Ingredients:
1 part Chilled Prosecco
1/2 part Apple Cider
Fresh thyme and rosemary

Method:
Pour prosecco and top with cider.  Garnish with fresh herbs and enjoy!


SHARE:

Saturday, July 14, 2018

French Potato Salad

I've come a long way baby.

Let me explain.  Growing up, I had a very loose, slightly on, mostly off, relationship with potato salad.  And considering that most of the potato salad I came across at family meals, barbecue's, cookouts, and the like, contained their fair share of mayonnaise, I was simply not a fan.

It's never easy to convey why you don't take to a particular food--especially when it seems that most you know and come across are fans.  But there I was--the girl, now woman, with a distinct disdain for this favorite dish and its main dressing.  However, I'm fortunate that as my natural development continued, so did my palate's evolution, and I ultimately came to like--not love--traditional potato salad.  Nothing major, but I could handle a serving or two a few times a year.

And then I was given the gift of discovering what seemed to be a recipe created just for me and my fellow non-mayo cohorts: an herb-y, vinaigrette tossed, and beyond delicious, French Potato Salad.  Made of tender red and white potatoes, with accents of fresh herbs, a luscious champagne vinaigrette, and a few other flavorings of white wine, chicken stock and green onions, it's one of my favorite side dishes for any occasion and my definite go-to when I'm on potato salad duty.  It's a lighter, elegant spin on the classic American-style and suits me (and my taste buds) perfectly.

I brought it back to life in my kitchen recently for a family gathering, and let's just say the bowl was empty at the end of our time together (humble brag -:) ).  It serves up beautifully warm or at room temperature, making it extremely versatile and picnic friendly.  Make it for yourself and I'm certain you'll be coming back for more.

Happy Eating!

French Potato Salad >>> Get the recipe here!
SHARE:
© D.M.R. Fine Foods. All rights reserved.
MINIMAL BLOGGER TEMPLATES BY pipdig